Monday, June 3, 2013

Top 9 Best Antivirus Software for Windows 8 of 2013

Filled under:

Computer Viruses have been an threat to every user online or offline. As we hold and share a huge amount of personal data online. If our Computer is being hacked or affected with virus, then our personal data’s are gone forever. Viruses are like hacker’s pets that develop it and are being inject for unusual activities. If these viruses are not monitored, then they become serious threat to the security of our Computer and data’s in it. For all these worries we have come up with the Best Antivirus Software for Windows 8.
Antivirus Software,Antivirus Software security,Security shield,shield,virus shield,
Antivirus Software Security
Now you might be a bit confused on which antivirus software to use on Windows 8, and which might be the best? So to give a solution for all your confusions here, we have come up with the list of Best Antivirus software’s for Windows 8 of 2013.

Top 9 Best Antivirus Software for Windows 8 of 2013:

  • Microsoft Security Essentials
  • Bitdefender Antivirus
  • Avg Anti-Virus
  • Panda Anti-Virus
  • Avira
  • F-Secure Anti-Virus 2013
  • G Data Antivirus 2013
  • Kaspersky Antivirus
  • Norton Anti-Virus 2013

Microsoft Security Essentials :

Antivirus Software,MSE,Microsoft Security Essential
Microsoft Security Essential
Microsoft Security Essential is one of the best and mostly used antivirus software for Windows users designed by Microsoft. The reason why most of them use this antivirus is that, it works very well on detecting viruses and spyware. It is an versatile antivirus software that works well even with Minimum configured PC’s. The overwhelmed feature about this software, is that it’s available for free and it is quite easy to use.

Bitdefender Antivirus

Antivirus software,Bitdefender Antivirus,
Bitdefender Antivirus
Topping the Second on our list is the most popular and effective antivirus software “Bitdefender Antivirus”. When it comes to its notable feature of specially made for detecting and deleting virus created spaces. In terms of detectingMalware – “Bitdefender” stands second on the list of paid anti viruses, which is why it’s being so popular and well known. The only drawback that has been experienced on Bitdefender is that, sometimes it reduces the system speed during the effective scanning process.

AVG Anti-virus

antivirus software,AVG Anti-virus,
AVG Anti-virus
AVG Anti-Virus is another Secure Anti-virus software that is available for free. It is a Great software which has been made in an easy to use manner for every computer user who wants to keep their PC secure in all the necessary way. AVG detects all the threats, viruses and malwares from affecting your PC. If you are an online user who uses banking sites and are scared, then you may surf them fear-free as AVG takes care of its full protection. It is an ultimate application that comes with an free phone support of 24×7.

Panda Anti-Virus
antivirus software,panda antivirus software,panda antivirus,panda antivirus 2013,antivirus software 2013,techbuzzes
Panda Antivirus
“Panda Antivirus” is yet another antivirus software that has scored excellently on detecting malware and unknown threats. It helps in protecting your network, and making it secure so that hackers and intruders don’t get inside your network anonymously. The effective part of Panda Antivirus is that it, doesn’t affect your computer speed and it optimizes the processor effectively while scanning.

Avira Anti-Virus

antivirus software,Avira antivirus software,avira,techbuzzes
Avira Antivirus
Avira is an free anti-viruses available in the market which is considered to be the best among the other free antivirus software. Increasingly users are opting for Avira day by day as it is free yet effective tool available for Windows 8.

 Download Avira


F-Secure Anti-Virus 2013

antivirus software,F-Secure Anti-Virus 2013,F-Secure Anti-Virus software 2013,F-Secure ,F-Secure Antivirus,techbuzzes
F-Secure Anti-Virus 2013
F-secure Antivirus has been featured to be the next on the list of best anti-viruses. It brings an extreme and interactive user friendly interface. This software is quick, very smooth, effective & efficient and light weighted. F-secure make track of all your system for the threats and it removes those and detects all those harmful threats which are not even detected and have not been recognized by other anti-virus software’s. In addition, it also plays a protective guard part by protecting computer from viruses which spread thoughts emails and cookies.

G Data Antivirus 2013
G Data Antivirus 2013,antivirus software,antivirus software 2013,G Data Antivirus,G Data Antivirus 2013,techbuzzes
G Data Antivirus 2013
G data Antivirus” is one of the noticeable anti-virus of 2013 as it comes offering an high security. Even though it is highly effective in detecting online viruses and worms, it can be easily used as well. It’s been updated with high performance and been efficient in optimizing.

Kaspersky Antivirus

Kaspersky Antivirus,antivirus software,Kaspersky Antivirus software,Kaspersky Antivirus 2013,
Kaspersky Antivirus
The most widely used and known Antivirus program for windows 8 is Kaspersky.  Kaspersky maintains it high standard and reputation, when comparison to the other antivirus programs that are available in the market. It provides an outstanding feature visualizing its ability in detecting the malwares and removing those malware threats from the PC.

Norton Anti-Virus 2013
Norton Anti-Virus 2013,antivirus software,Norton Anti-Virus 2013,Norton Anti-Virus software 2013,techbuzzes
Norton Anti-Virus
Ending on our list is the very effective and the world’s most popularly known antivirus software by Symantec is “Norton”. When it comes to Norton, the most popular Anti-virus is that it gives all the efficient rights to the user and waits for the user to finish the task before the scanning for virus’s starts and it’s performing for the right actions. It has an very cool interface and easy to access functions which keeps your system virus free and Secure.

Posted By Light7:46 AM

[How-To] Recover Deleted Files on Your PC, Pen Drive, or Memory Card

Filled under:

Have you ever deleted your important file from your Computer or any External device accidentally? And couldn’t find a way out to retrieve the file which was deleted accidentally? Then we have an excellent solution for all those, who are worried on losing their important files from computer or any external Device like: USB Pen drive, memory card, etc. Now it’s very easy to Recover Deleted Files on Your PC, Pen Drive, or Memory Card with life saving software called UndeleteMyFiles Pro.
UndeleteMyFiles Pro,Recover Deleted File,Recover Deleted Files,Recover Files on pc,Recover Files on memory card,Recover Files on SD card,Recover Files on hard disk,techbuzzes
UndeleteMyFiles Pro
UndeleteMyFiles Pro is a free software tool which helps you to recover deleted files very easily and quickly to a specific location. So that you do not lose your files again. It has been designed with one of the best feature, where you will be saving lots & lots of time in recovering your deleted files. Yes, the feature enchants you to search with specific File NameFile Type and File Size which was deleted and allows you to restore it.
Now let’s go through the guide on,

How-To Recover Deleted Files on Your PC, Pen Drive, or Memory Card:

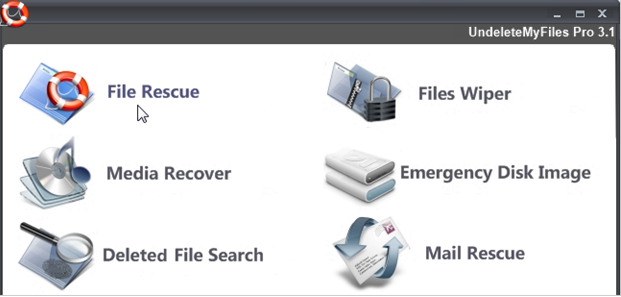
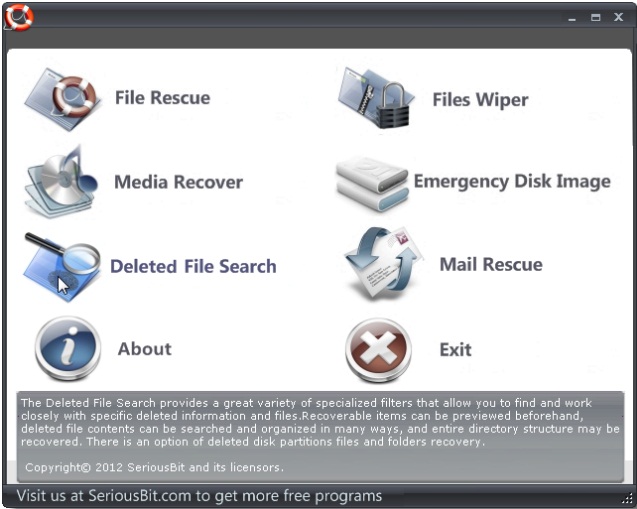
To recover the accidentally deleted file, you need to click on the first option on the list -> File Rescue which appears on the main screen of UndeleteMyFiles Pro.
UndeleteMyFiles Pro,Recover Deleted File,Recover Deleted Files,Recover Files on pc,Recover Files on memory card,Recover Files on SD card,Recover Files on hard disk,techbuzzes

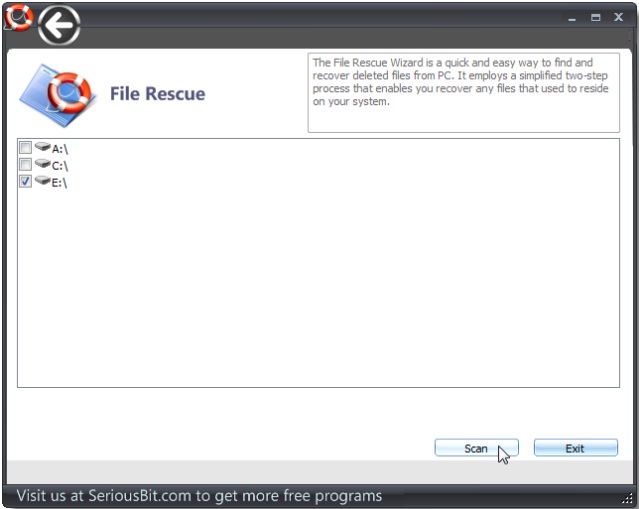
Now your computers Drives and External Drives which are connected will be listed. From the list of drives select for the drive that contained your accidentally deleted file and then begin your scanning process by clicking on SCAN option.
UndeleteMyFiles Pro,Recover Deleted File,Recover Deleted Files,Recover Files on pc,Recover Files on memory card,Recover Files on SD card,Recover Files on hard disk,techbuzzes
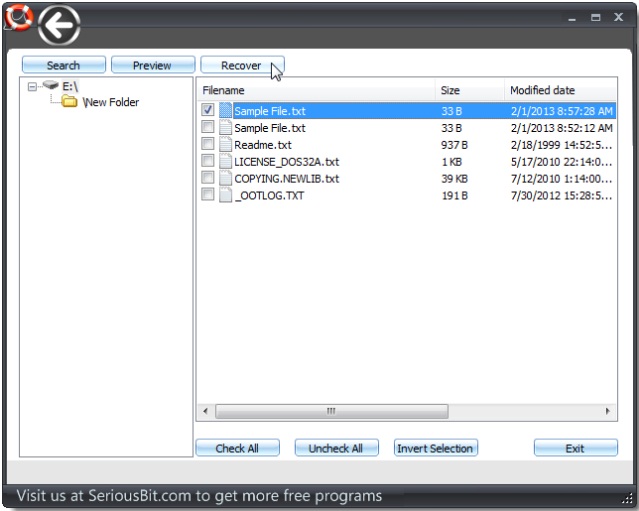
After Scan completes, all the list of files that were deleted will be displayed. To recover the required files, all you need to do itselect the check box next to the file and then press on Recover.
UndeleteMyFiles Pro,Recover Deleted File,Recover Deleted Files,Recover Files on pc,Recover Files on memory card,Recover Files on SD card,Recover Files on hard disk,techbuzzes

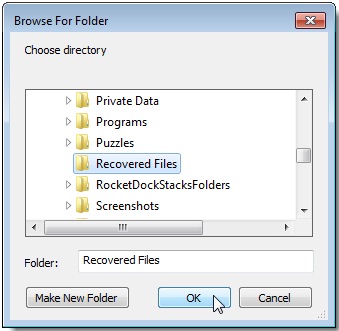
Once you have clicked on Recover, a box will appear asking you to select the location where you wish to recover the restored files.
UndeleteMyFiles Pro,Recover Deleted File,Recover Deleted Files,Recover Files on pc,Recover Files on memory card,Recover Files on SD card,Recover Files on hard disk,techbuzzes
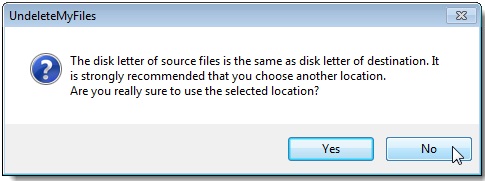
If you save the files on the same drive on which the files were deleted from. A warning message will be displayed. Mostly it is recommended to save the file on a different location of the hard drive.
UndeleteMyFiles Pro,Recover Deleted File,Recover Deleted Files,Recover Files on pc,Recover Files on memory card,Recover Files on SD card,Recover Files on hard disk,techbuzzes

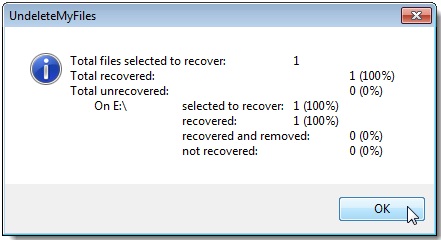
After saving the file and completing the recovery process and box will show up with the statistics on the process.
UndeleteMyFiles Pro,Recover Deleted File,Recover Deleted Files,Recover Files on pc,Recover Files on memory card,Recover Files on SD card,Recover Files on hard disk,techbuzzes

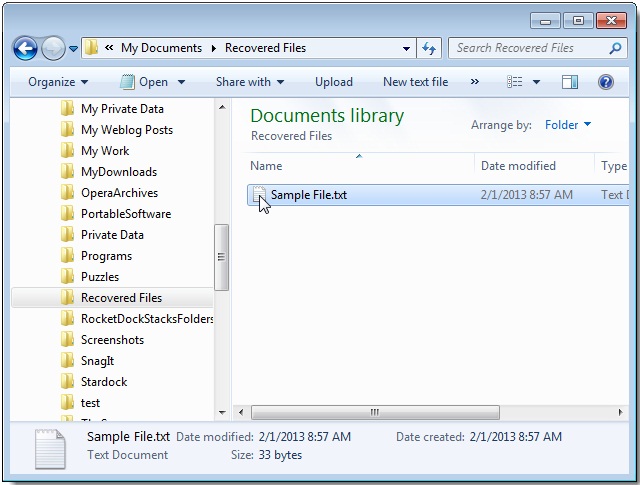
Click OK and you are done. The files which you recovered will be available on the location where you saved.
UndeleteMyFiles Pro,Recover Deleted File,Recover Deleted Files,Recover Files on pc,Recover Files on memory card,Recover Files on SD card,Recover Files on hard disk,techbuzzes

Search for Specific Deleted File:

There is another method of searching your File directly, which save lots of your time. You can easily be able to search for a specific deleted file by clicking on Deleted File Search option.
UndeleteMyFiles Pro,Recover Deleted File,Recover Deleted Files,Recover Files on pc,Recover Files on memory card,Recover Files on SD card,Recover Files on hard disk,techbuzzes

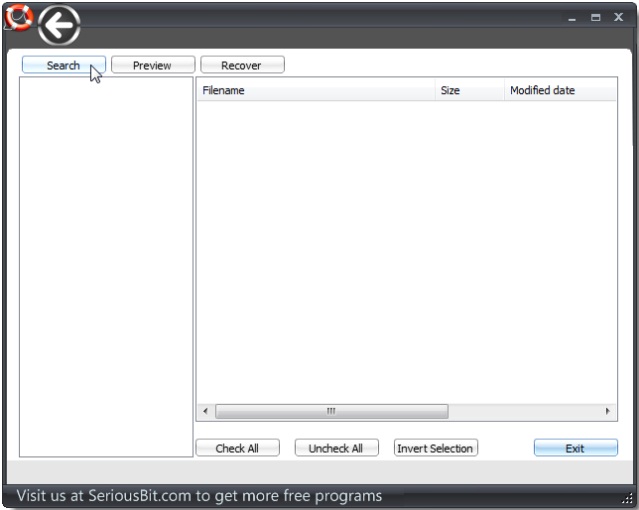
Then click on the Search option.
UndeleteMyFiles Pro,Recover Deleted File,Recover Deleted Files,Recover Files on pc,Recover Files on memory card,Recover Files on SD card,Recover Files on hard disk,techbuzzes

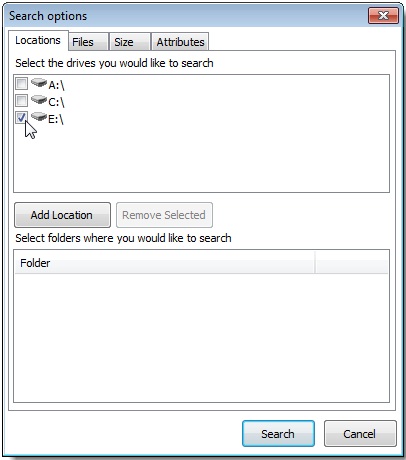
Once you click on the Search Button, the Locations tab appears with the Drive letters. Select the drive on which you would like to search.
UndeleteMyFiles Pro,Recover Deleted File,Recover Deleted Files,Recover Files on pc,Recover Files on memory card,Recover Files on SD card,Recover Files on hard disk,techbuzzes

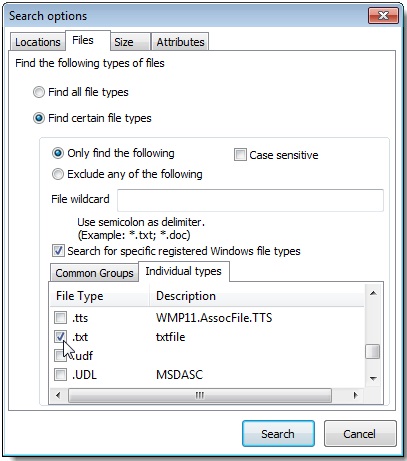
On the Files Tab you can find specific types of files. You will be allowed to search all files types (or) Certain File Types.
UndeleteMyFiles Pro,Recover Deleted File,Recover Deleted Files,Recover Files on pc,Recover Files on memory card,Recover Files on SD card,Recover Files on hard disk,techbuzzes

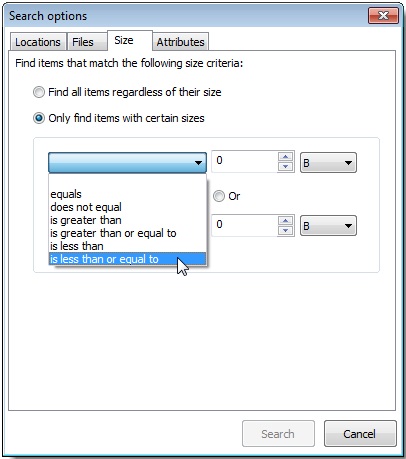
On the Size Tab, we can be able to find the file by specifying the size of the file that needs to be recovered. You can indicate in what size the specified file is in, whether it’s in B, KB, MB, GB.
UndeleteMyFiles Pro,Recover Deleted File,Recover Deleted Files,Recover Files on pc,Recover Files on memory card,Recover Files on SD card,Recover Files on hard disk,techbuzzes

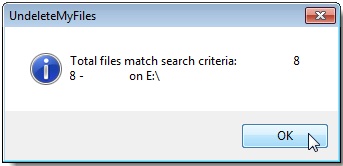
Attributes Tab – helps you to search the file by specifying its attribute type. After specifying click on Search. Then the search operation is performed and after finishing the search, the summary is displayed.
UndeleteMyFiles Pro,Recover Deleted File,Recover Deleted Files,Recover Files on pc,Recover Files on memory card,Recover Files on SD card,Recover Files on hard disk,techbuzzes

The recovered files that we searched by its type are listed. Select the files that you wish to recover from the search result and then click on Recover. and you are done as always, all your selected files are recovered and stored on your selected location.
UndeleteMyFiles Pro,Recover Deleted File,Recover Deleted Files,Recover Files on pc,Recover Files on memory card,Recover Files on SD card,Recover Files on hard disk,techbuzzes

UndeleteMyFiles Pro not only Recover Deleted Files, it even deletes files securely in a way that it cannot be recovered permanently.

Download UndeleteMyFiles Pro

Posted By Light7:44 AM

[How-To] Speed Up the Computer and Increase its Performance

Filled under:

Now everyone likes having all their stuffs, getting stuffed in to their Computers or Laptop. They never want to miss anything, beginning with the Latest Software’s, Games, Documents, Movies, Music…etc, and so on. The list never seems to be ending. And In spite of having so much of stuffs, no one likes their computers getting slow and performing the task and responding it late with delays. We always want it to work faster than ever. But unfortunately when we have filled our hard disk with so many things and running all the applications, obviously it reduces the performance of computer and slows down our PC. To overcome all these issues, today we come up with some excellent methods on How To Speed up The Computer And Increase its Performance.
Speed Up the Computer,techbuzzes
  • Method 1: Cleaning the Temp and %temp% Directory

  • Cleaning the Temp:
STEP 1: Click Start and Go to Run and then Type “Temp” in to the textbox of run and Press ok
Speed Up the Computer
STEP 2: Now you will be on TEMP folder, and you could see the files available on the folder.
STEP 3: Simply delete all the files that are available in this Directory.
  • Cleaning the %Temp%:
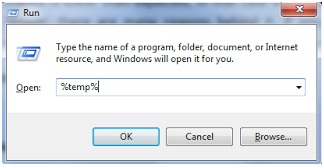
STEP 1: Click start and Go to Run and then Type “%Temp%” in to the textbox of run and press ok
temp folder,windows temp folder,Speed Up the Computer,techbuzzes
STEP 2: Now you will be on %TEMP% folder, and you could see the files available on the folder.
STEP 3: Simply delete all the files that are available in this Directory.
  • Method 2: Performing a Disk Cleanup on Drives:

STEP 1: Click on Start > All Programs > Accessories >Systems Tools > Disk Cleanup
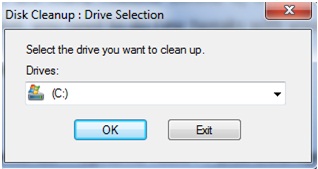
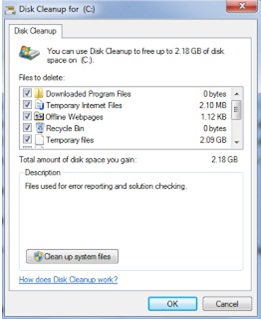
STEP 2: Disk Cleanup screen will pop-up, Now Select the Disk Drive in which you want to Perform Disk Cleanup.  And then Press OK. 
Disk Cleanup,Windows Disk cleanup,Speed Up the Computer,techbuzzes
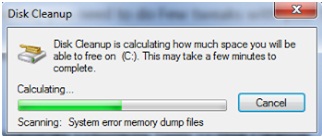
(NOTE: It will calculate the space occupied and it may take some time to Process)
Disk Cleanup,Windows Disk cleanup,Speed Up the Computer,techbuzzes
Now you could  see  that the C: Drive has 2.18 GB of unnecessary files and old memory files that are occupied and could be released once you disk cleanup the C: Drive.
STEP 3: Now select all the Check Boxes appearing, and press on OK. The disk cleanup process will get started and you will retain the free space once the disk cleanup completes.
Disk Cleanup,Windows Disk cleanup,Speed Up the Computer,techbuzzes
(NOTE: Perform the Same Step Above to free up all other Drives)
  • Method 3: Deleting the Files from Prefetch Directory:

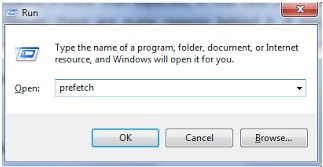
STEP 1: Click start and Go to Run and then Type “Prefetch” in to the textbox of run and press ok.

prefetch,Windows prefetch,Speed Up the Computer,techbuzzes
STEP 2: Now you will be on Prefetch folder, and you could see the files available on the folder.
STEP 3: Simply delete all the files that are available in this Directory.
(NOTE: You must be logged into administrator privilege account to access into this directory)
  • Method 4: Speed Up the Computer by Defragment all the Disks:

STEP 1: Click on Start > All Programs > Accessories >Systems Tools > Disk Defragmenter
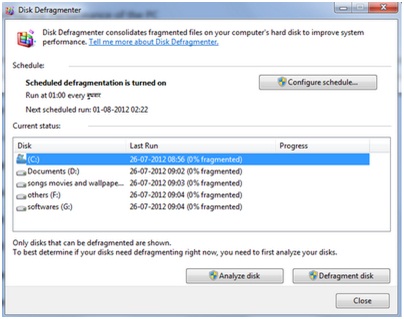
STEP 2: Then select the Disk Drive which you would like to defragment, and then click on Defragment Disk.
disk defragment,Windows disk defragment,Speed Up the Computer,techbuzzes
STEP 3: The process may take some time, and once completed Restart your PC to see better performance.
(NOTE: Perform the Same Step Above to defragment on other Disk Drives)
  • Method 5: Use Minimum Icons on Desktop to Speed Up the Computer:

Most of the users fill up their desktop screen with lots of icons. It is always suggested to having your desktop clean. So it gives a clean look of your windows interface. Suppose you have many applications or programs to use instantly when ever your pc turns on. Then you could categorize those programs by creating a folder and having all your program shortcuts in it. By using the shortcut of the programs may Speed up the Computer and increase the Computers performance.
  • Method 6: Perform a Full PC Scan with Updated Antivirus

Always have a genuine and updated antivirus with you. Make sure your antivirus program is good enough in detecting the Virus, Threats, and Trojans…Etc, and keeps your pc protected. A good and updated antivirus program always protects your Computer and Speed Up the Computer.
Well those were the methods listed on how to Speed Up the Computer and Increase its Performance. Trying all those listed methods is at your own risk. Experience the methods on Speed Up the Computer and visualize your computer coming to life.

Posted By Light7:42 AM

Get Variety of Classic Start Menu For Windows 8 [How-To]

Filled under:

Windows 8 has come up with lots of changes, both internally and externally. Most of the changes have been visualized such as faster booting time, but many of the users are struck in adjusting the Modern UI. As the Modern UI has come up with variety of changes. Missing the Start menu from Windows has found to be disappointing. So if you among those, who are worried about the start menu missing in the Latest Windows 8, then we have come up with an brilliant solution on Getting Variety of Classic Start Menu For Windows 8.

Four Variety of Classic Start Menu for Windows 8:

  • Classic Shell :
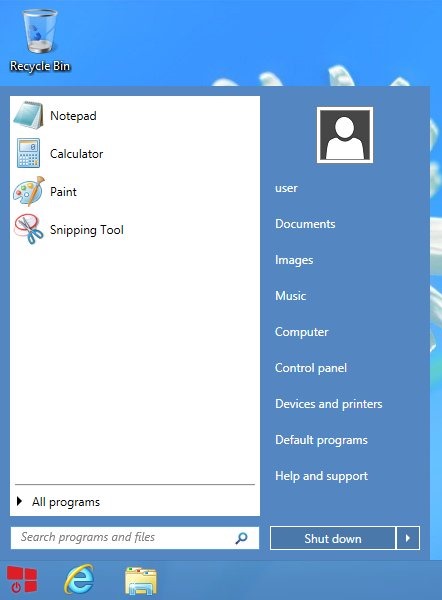
Classic Shell is a cost-free resource that gives you back not just a Windows 7(esque) start menu, nonetheless it even gives you Microsoft windows xp style start Menu. In addition it brings back a classical explorer interface. For people who really need to reduce the day to day use of Modern interface, there’s in addition a solution which lets you kick start and boot straight away to desktop without needing to be landed on the new windows 8 start menu.
Start Menu For Windows 8,classic shell Start Menu For Windows 8,classic shell,windows 8 menu,windows 8,techbuzzes
Classic Shell Menu
  • IOBit StartMenu8 :
IOBit StartMenu8 is an another application tool that brings you back the classic style start menu for Windows 8. The idea enables you to perform the majority of things that classic shell does indeed, yet carries a far better reproduction on the Windows 7 Start Menu. It can possibly allow you to skip directly to desktop during boot, it even disables corners and hide your bars. It is a fantastic option when just about all you are in search of windows 7 like boot option and start menu, which is speedier obviously.
Start Menu For Windows 8,IOBit StartMenu8 Start Menu For Windows 8,IOBit StartMenu8,windows 8 menu,windows 8,techbuzzes
IOBit StartMenu8
  • StartW8 :
StartW8 is among the most simply collection of tools which simply gives a start menu with no other changes. Start Menu itself assumes like windows 8 graphic style and also other thing it can perform is to definitely skip you to the desktop right on the login time. There is virtually no proper click efficiency, nevertheless the search functionality is very much effective.
Start Menu For Windows 8,StartW8 Start Menu For Windows 8,StartW8,windows 8 menu,windows 8,techbuzzes
StartW8 Menu
  • Pokki :
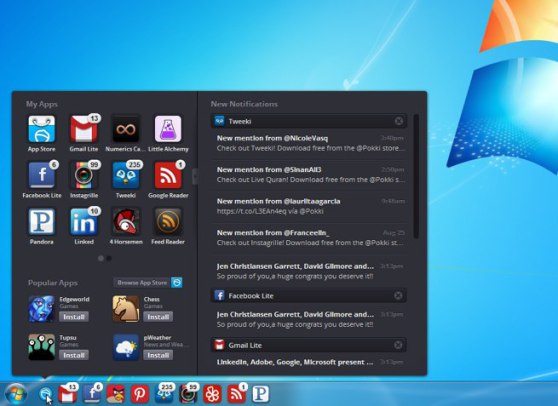
Pokki tools brings you back the classic style start menu in to your Windows 8 screen. Pokki is more of a replicate of the classic start menu for windows 8,well we can say it is a complete move over and replacement. It additionally displays you all the installed programs, effective search bar, items that are pinned and has an widget of its own. Ex: you will be given a small GoogleMail(Gmail) widget that displays and pop’s up mails on the start menu. The effective thing is also that, the search bar is not only for your local computer to search files locally, it has been designed effectively to make searches over the internet as well.You can search anything on the net easily by seaching on the Search bar in the start menu.It allows you to disable the hot corner and directly boots you to the desktop.
Start Menu For Windows 8,Pokki Start Menu For Windows 8,pokki ,windows 8 menu,windows 8,techbuzzes

Posted By Light7:41 AM

[How-To] Open .IMG Image Files in Windows 8 without Any Software

Filled under:

‘.IMG’ is one of the CD (or) DVD Image file that is like an ISO file. The IMG file is mostly used as an compressing tool and burning its files directly in to the CD or DVD. Operating System (OS) files are now mostly put as an .img file, such that it is created in to a single file. Before, to open an IMG file we required third party tools or software’s. But now windows 8 have treated us with an excellent inbuilt default feature to open or Mount the .IMG files or the ISO files without any third party tool or application.
Here we bring you to a simple trick on How to open image files in windows 8 without any installation of third party tools or applications. The trick is very simple yet very effective because it saves lots of your time.
All you have to do is, change the extension of your .IMG file to ISO. As windows 8 detects the ISO files and allows you to open the ISO extension by default. In some PC’s it will automatically detect the .IMG file as ISO and it can be directly used even without changing the format. If windows 8 doesn’t detect your .img image file by default, you need not worry. Just follow the simple steps below.

Follow the Steps To open .Img Image File in Windows 8 Without Any Software :

Below is an .img file that needs a software tool to open or mount the image;
image file , iso image file,  As you can see, the file is not recognized as an ISO file. So Change the extension of the file to iso by renaming the file.
EXAMPLE: officeProfessionalPlus_x86_en-us.img     to     officeProfessionalPlus_x86_en-us.iso
  Note: if you do not see the file extensions. Then you will have to uncheck the ‘Hide extensions for known file types’ under ‘Folder options’ to view the file extension types.
image file,iso image file,uncheck folder,
After renaming the same file, you can see the file has been detected as readable Image file format by windows 8.
image file,iso image file, iso image
You can clearly see that the file icon has been changed. And is made ready to mount with the Windows 8 built-in ISO utility tool.
Now you only need to make a right click on the re-named image file, and you can see MOUNT option getting displayed. Just click on the mount option and your image file is ready to mount. you are done,
image file,mount image ,mount iso

Posted By Light7:37 AM