Monday, May 13, 2013

Dont like Chrome New Menus? Here is how to Disable Them

Filled under:


How to Disable new white context menus in Chrome 26

1. Right click on Chrome shortcut on desktop, select Properties
2. Hit the Shortcut tab, now in Target field at the end of “C:\Program Files\Google\Chrome\Application\chrome.exe” after space add “–disable-new-menu-style” without quotes. (add two hyphens before disable).
adding command line swith to Chrome executable path thumb Don’t like Chrome’s New Menus? Here is how to Disable Them
3. Click Apply and OK to add the change.
4. Now launch Chrome browser from the shortcut, you can see old menu style for both Chrome settings menu and context menu.
At present there is no other way than the procedure mentioned above to revert back to old  menus in Chrome. IMO there is no way Google will drop them unless gets huge criticism and feedback on it from users.
Has the workaround mentioned above worked for you? do you think Google will ditch this UI style for menus and brings old styled context menus back? share your thoughts with us in comments.

Posted By Light11:04 PM

Avira Free Antivirus Finally gets Windows-8 Certification

Filled under:


If you don’t know: Avast is the first free AV to get Windows 8 certification and made its way to the Windows store. Getting Certification logo of “Windows 8 compatible” or “designed for” isn’t  easy for security vendors as Microsoft certification process is tough to pass.

Avira Free antivirus 2013 is now compatible with Windows 8?

Avira has been hardly working since September 2012 to make its 2013 products officially compatible with Windows 8, they’ve announced first quarter for that achievement. Indeed they’ve succeeded finally but free AV only got certified but not its home and premium security products. Avira says they still work well on Windows 8.
Before certification process when users try to install Avira users got “this program has compatibility issue” pop up dialog which now won’t appear as it has been removed by Avira after getting certification.
Avira Free Antivirus 2013 gets Windows 8 certification thumb Avira Free Antivirus Finally gets Windows 8 Certification
Yesterday Avira has issued new program update for its free Av, after installing this update or latest version you’ll notice following changes.
  • When you try to install Avira in Windows 8 no warning pop up will be shown
  • Windows 8 Defender will be automatically deactivated after installation of Avira.
  • Avira products register and integrate well with Windows  8 action center.
  • Product updates added into detection updates.
Are you using Avira Free Av on Windows 8? is it working properly for you?share with us in comments.

Posted By Light11:03 PM

How to remove Google Chrome if you cant uninstall it?

Filled under:


If you’re not able to uninstall Google Chrome browser from Control Panel then you can manually remove it so that you can able to reinstall Chrome on your computer. When you want to uninstall Chrome to reinstall new version if its uninstallation stopped by showing error then there is no way of moving forward, but you’ve to uninstall it you can manually remove it by following below mentioned steps.

How to manually Remove Google Chrome browser from Windows

1. Download and save “Remove Chrome” named registry file to your computer.
2. Right click on it and select “Merge”.
3. Click on “Run” button on open file security warning dialog, then registry editor warns unless you trust the source file don’t add the information in it to the registry, click “yes” to add it to registry.
4. Now having deleted Chrome related registry entries, as next step we need to locate Chrome installed directory and delete it. That’s easy, follow below instructions.
In Windows XP using run command box navigate to “%USERPROFILE%\Local Settings\Application Data\Google”
On Windows Vista/7/8 navigate to “ %LOCALAPPDATA%\Google” and delete Chrome folder (check the screenshot below).


That’s it! now you can reinstall Chrome without any issues.
Let me know if this helped you in manually removing Chrome if its uninstall has failed in comments.

Posted By Light11:03 PM

Backup and Restore Wireless Network Profiles in Windows 7-8 with Network Profiles Utility

Filled under:


If you plan to reinstall Windows or want to move current Wireless network connection settings and static IP/DNS settings to another PC or deploy these settings on multiple PCs you need to backup wireless network profilewhich is tedious task that can be done by following various steps starting from Control Panel, but freeware portable Network Profiles Utility lets you easily import and export wireless connection profiles to and from a computer easily.

How to Backup and restore Wireless Connection Settings on Windows 7/8?

Program developer says “Network Profiles Utility is convenient for end users, computer repair techs, and network admins to restore wireless connection settings and static IP/DNS configuration settings after format/reloading a PC, replacing a PC with a newer one, or even deploying wireless connection profiles and/or static DNS settings to multiple PCs.”
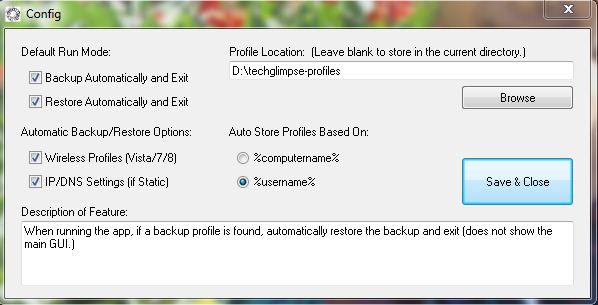
Using Network Profiles Utility: Download the program zip file, extract its contents to a folder and run Network Profiles Utility executable. On the first run a dialog is displayed to visit “config” window where you can see various options.


Click on “Browse” button to specify the profile location, and you should know that by default if no backup profile found on your PC then the utility on first run automatically backs up wireless profiles and IP/DNS Settings (if Static) and saves profiles by computer name and it exits it self automatically. Which you can select to store by username if you want from Config window. Click on “Save & Close” button.
Similarly if backup profile found on your computer then it will be automatically restored and program exits.


So the utility backs up up wireless network connection profile to folder or location you specified earlier. To restore this profile after reinstall of Windows, you need to copy that backup copy of network profiles folder and run the program again, this time after detecting profile backup copy it asks to import it, click on “Import” button to finish restoring.
Network Profiles Utility works on Windows Vista/7/8, you can download it from here.
Do you know about this utility? which freeware utility do you use to backup and restore wireless connection settings on your PC?share your thoughts with us in comments.

Posted By Light11:02 PM

Open Windows Applications from Firefox Add-on bar with Easy Access Addon

Filled under:


How many times in a day you close the browser and work with other programs on your computer?. These days most people spend their times on web in browser by visiting social networking sites YouTube, Google+ and Facebook. If you use Firefox browser through out the day then why you need to switch to desktop to open some programs and to run system commands? which you can do easily from add-on  bar of Firefox browser by installing Easy Access add-on.
Using Easy Access is easy, install it and its icon appears on extreme right on Add-on bar(status bar functionality moved and replaced with Add-on Bar). You don’t even need to add some routinely used programs on windows like Notepad, Paint, Calculator and My computer as they’re already available from Easy Access button.
You can add most often used  applications like CCleaner, Chrome and other by clicking on “Mange your own Easy Access” and from customize your quick launch you can browse for the path of application to add and access from add-on bar.
Easy Access add on button thumb Open Windows Applications from Firefox Add on bar with Easy Access Add on
There is nothing great about this extension, but we got to know that it is possible to launch Windows Applications from Firefox browser through this add-on.
Add customized quicklaunces in Easy Access thumb Open Windows Applications from Firefox Add on bar with Easy Access Add on
You can install this add-on from here. What do you say about this add-on? have you found any use with this? share with us in comments.

Posted By Light10:59 PM

How to Disable Windows Update on Windows 8?

Filled under:

Microsoft, the producer of Windows 8 system, always recommends to users to update their Windows system regularly. To some, it causes issue to their system. It is a fact that sometimes updates mess up the computer and it simply causes conflict with other programs installed on the computer. It induces some users to disable Windows Update and to ignore crucial or important updates eventually. 

I’d been using Windows since 2007 (from XP up to 8). Since I upgraded from Windows 7 until 8, I never downloaded and applied updates to my computer except for manually installing the .NET framework security updates. As per my experience, the more I install updates, the more it gives me headache. I know my computer is vulnerable to malware or whatever but having a paid antivirus program plus Malwarebytes are enough for me. Also, I’m very careful with my activities online. I always ensure that I only visit those trusted websites and avoid those messy and unhelpful sites at all. 

Now, if you are one of those Windows 8 users who don’t want to update at all, here’s a short guide for you on how to temporarily disable Windows Update on Windows 8. I used the word ‘temporarily’ because you have the option to re-enable it in the future if the need arises. 

Temporarily Disable Windows Update 

Step 1: In Desktop mode, press Windows logo key plus X key to access the Windows Tools menu. Select ‘Computer Management’. 

Step 2: Select ‘Services and Applications’ at the left-hand side of Computer Management Window. 

Step 3: Double click ‘Services’. 

Step 4: Find and locate the following services: 
→ Background Intelligent Transfer Service (BITS) 
→ Windows Update 

Step 5: Double-click the two services provided above then under Startup type select Disabled. Click Apply → OK to save. 

After that, highlight each service one by one then on the left hand side click ‘Stop the service’ 

Tip: It is OK to leave BITS enabled most especially if you have Microsoft Security Essentials installed on your PC. BITS is an important component for your machine to fetch signature updates. 

Step 6: Close Computer Management window and you’re done. 

Untitled”Disabling BITS and Windows Update services via Computer Management window” 

Since you disabled both BITS and Windows Update, it is normal that you will get notification to re-change your settings as Microsoft strongly recommends to always update and the system will always notify you about it. 

Disable Windows Update via Control Panel 

Here’s an alternative way of disabling Windows Update from downloading and installing security updates automatically. You can apply this workaround together with the steps above or just follow this one. 

Step 1: In desktop mode, click Windows logo key (WINKEY) plus X to pull up Windows Tools menu. 

Step 2: Select Control Panel. 

Step 3: In Category view, go to System and Security Windows Update 

Step 4: Click Change Settings in the left-hand corner then select ‘Check for updates but let me choose whether to download and install them’ or ‘Never check for updates (not recommended)’. Click OK to save. 

Untitled2”Disabling Windows Update via Control Panel”

Posted By Light10:58 PM

Add Nate Email to Microsoft Outlook

Filled under:

Nate Mail is a free web-based e-mail service developed by SK Communications, owner of Nate, a famous web search portal in South Korea. Signing-up for an account entitles every user to get up to 30GB of free e-mail storage which is bigger compared to Yahoo or Gmail. 

A lot of Korean citizens sign-up for a Nate e-mail account. Even foreigners register as well even though the website is only available in Hangul. 

If you own a Nate e-mail account, you can add it to Microsoft Outlook so you won’t have a hard time using the web-based portal. Thus, you’ll be able to perform e-mailing tasks quickly since Outlook is rendered in your preferred language. 

If you don’t know yet how to setup Nate Mail in Outlook, here’s a step-by-step guide on how to do it. 

Setup Nate Mail in Outlook 

Step 1: Open Microsoft Outlook. Go to File → Info then click Add Account button.

Note: I used Microsoft Outlook 2010 in this tutorial. If you are using an old version of Outlook, please check for a guide online on how to set-up a new account if you are having trouble following the rest of the steps below. 

Step 2: In Add New Account window, tick ‘Manually configure server settings or additional server types’. Click Next. 

Step 3: In the next page, tick ‘Internet E-mail’. Click Next. 

Step 4: Type-in your user information (Name and Nate e-mail address). You can use whatever name or alias you want. 

Account Type: IMAP 
Incoming mail server: imap.nate.com 
Outgoing mail server (SMTP): smtp.mail.nate.com Username: Don’t include @nate.com. Just put in your complete e-mail username. 
Password: Type in your e-mail password 

Put a check mark on ‘Remember password’ box. 

Step 5: Click ‘More Settings’ button. Go to Outgoing Server tab then put a checkmark on ‘My outgoing server (SMTP) requires authentication’ box. 

Outgoing Server setting – Nate Mail
Outgoing Server Setting – Nate Mail

Still on the same window, go to ‘Advanced’ tab the put the following values (server port numbers) on each corresponding box. Look at the screenshot below for your reference. 

Incoming Server (IMAP): 993 (SSL) | Outgoing Server (SMTP): 465 (SSL) 

Incoming and outgoing server port numbers of Nate Mail.

Click OK. 

Step 6: Going back to ‘Add New Account’ window, hit Next. Outlook will now conduct a test to confirm that the configuration is working properly. 

Step 7: Click Finish. Outlook will now download and create a root folder for your Nate e-mail account. It will take a few minutes to finish downloading all your e-mails depending on the volume.

Posted By Light10:54 PM

Show Most Visited Sites on a New Tab in Internet Explorer

Filled under:

In Internet Explorer 9 or 10 you can choose what shows on a new tab. It can be the primary home page or the ten most visited websites. 

When you open a new tab in Explorer 9 or 10, you can choose what shows on it or just leave it blank. Here are the three common options: 

1. A blank page 
2. Frequently visited websites 
3. Default or primary home page 

Sometimes, when your machine is infected with a virus, the default setting is changed. Users are having a hard time looking for a way to restore back the original setting. Actually, it’s very easy. 

For your reference, here’s a short guide on how to do it: 

Show Most Visited Sites in New Tab 

Step 1: Launch Internet Explorer. Click Settings. It’s the gear icon below close button at the upper-right hand corner. 

Select Internet Options. 

Step 2: In General tab, click ‘Tabs’ button. 

Step 3: Under ‘When a new tab is opened, open:’ drop-down options, select your preferred setting: 

Option 1 - Blank page 

Option 2 - The new tab page: shows thumbnails of 10 websites you visit the most. It also lists the last 10 closed tabs on Internet Explorer. Thus, you’ll be able to re-open important page you’ve closed accidentally. 

Option 3 - Your first home page: loads the default home page of Internet Explorer. Remember that in Internet Explorer you can set multiple home pages but the first one in the list will always be primary (Settings → Internet Options → Home page). For example: http://www.google.com/ 

Tabbed Browsing Settings window in Internet Explorer 10
Tabbed Browsing Settings window in Internet Explorer 10. It is where you can tweak settings on Tabbed Browsing.

Step 4:
 Click OK → Apply → OK. Now, you’re done. 

Try to check the setting you’ve applied by opening a new tab on Internet Explorer. No need to re-launch the program because the new setting will be applied automatically.

Posted By Light10:54 PM